Wednesday, August 27, 2014

Grace Shirt, Tunic, Dress, Maxi, etc

I recently tested the Grace Pattern by Rose and Lee Designs. It offers 6 length options: shirt, tunic, knee length dress, maxi, average, and petite. There are also 4 sleeve options: sleeveless, short, three quarter length, and long. 


I cannot express how much I love this pattern!! I may be biased because it is the first thing I have made for myself. I may be biased because my mom told me I looked pretty in it (and she NEVER does that)! I may be biased because I was able to sew it with my beginner skills! Who cares why I am biased! I LOVE this pattern! 

When I cut my pattern, I cut the yoke and rest of the pattern based on my overbust/chest measurement. I cut a 4x for the front panel to be sure it would go over my full bust! I planned to fit out any excess if necessary, but it fit like a dream!


I am adding my picture for fit only, but if you really want to see how gorgeous this pattern is, look at the other tester photos.  You can find their blog posts below. 

I plan on making myself several of this pattern: dresses, shirts, tunics, maxis!! Yes! Score! I love it!  Check out the maxi version with long sleeves!


If you think this pattern is lovely and gorgeous, you can buy it in the Rose and Lee Designs Shops on Etsy and Craftsy


But I also will be offering a giveaway in my Facebook sewing group, Sewing Inspiration and Tutorials. To enter, join the group and comment on this post: https://m.facebook.com/groups/219280448227014?view=permalink&id=351977221624002

Friday, August 8, 2014

Open Letter to the Designer on Pattern Testing

In case you can't tell from my posts here on the blog, I have been doing quite a bit of pattern testing. It's not because I don't have patterns. I assure you, I do. Like any other blue-blooded American girl who sews, I have more patterns than I can sew in a lifetime. I stock up on Big 4 commercial patterns whenever they are on sale. I also have a small collection of indie children's patterns because Melissa Mora of Blank Slate Patterns makes super cute boys patterns, and her directions are crystal clear. (Will be sewing up some of those soon.)

So here is an open letter to designers from me as a pattern tester. 

Dear Designer,

I really like testing patterns. Having this encouragement is the only way I seem to sew. I also enjoy the small group and camaraderie of the small sewalong. I enjoy having something to put on my blog. All in all, I generally enjoy pattern testing. 

But Designer, here is why I needed to write this letter though. There are a few things that must be made clear. 

First of all, Designer, getting a copy of your pattern is nice. In our arrangement, it is your end of the bargain, but it is in no way compensation commensurate with the time, effort, and materials that I have put into sewing the garment. Let's be clear. Your pattern, at most costs $20 (and that's at the high end. I have yet to test one that expensive). 

Any pattern I sew will eat that $20 "compensation" in labor alone! Who can tell me what minimum wage is? How many hours work can be paid with a $20 pattern?

Then we must factor in the materials, Designer. There is the paper and ink for printing pdf patterns. I was afforded the experience recently to print a 20 page pattern (and assemble it and trace it onto tissue paper to adjust it) only to find that the designer posted an updated draft the next morning. I was LIVID!

Materials also include fabric and notions. Designer, if you are conducting a pretest and will need more than one garment sewn, it needs to be stated in the beginning. I recently signed up to sew a bodice only. I was given the bodice pattern, sewed the bodice pattern, and was then given a skirt pattern to test. I tested the skirt pattern. I was then told that I needed to participate in another round of testing in order to get my copy of the final pattern when released. I more than fulfilled my commitment, as initially requested. Furthermore, because of the way the pattern was distributed (bit by bit), I ran out of fabric so I am stuck with a completely unwearable dress and have wasted a lot of fabric.  I am not a happy camper!

Finally, I would encourage you, Designer, to know the complexity of the task at hand. If you want a garment properly tested, it takes time. Each of the simple garments on this blog has been tested within the week allotted. I am very up front with designers about the fact that I am a beginner at sewing. I also am clear that I wear well above a B cup and that I will need to adjust the bodice for a proper fit. Adjustments take time. Other aspects of proper sewing take time as well. If there are bias pieces, they need to hang before being cut and hemmed. Knit fabric also needs resting time. More complex designs will require more time as well. Be mindful of these things as you set timelines and deadlines.  If you have strict deadlines that cannot be changed and you are having to roll call half of your testers because they have not met your deadline, I assume that you have waited until the last minute and that you did not allot appropriate time for the testing. To me, that indicates poor planning. And as the saying goes...

Original Image Source
Again, pattern testers do it for FREE! In no way does a "gifted" pattern cover the time or materials for the project, but Designer, you need us. So make the experience enjoyable. Don't make it stressful. Be respectful of our time and materials by being organized. Understand that while this is exciting and top priority for you, we are in essence doing you a favor and not the other way around. You gain far more from the process than we do, but we do it because we enjoy it, because we think it's fun.  I always do my best to honor commitments, but real life can get in the way. Guess what? I have a real life that extends beyond your test!

If you want professional patten testers who work 100 percent on your time and don't act like volunteers, pay them.  Don't use volunteer hobby sewists, employ professionals.

But understand that, ultimately, part of the burden in testing is on me. I become invested as I spend time and money on this project. So respect me when I want to do it well. Designer, respect that!!  Recently, Bunny from La Sewista was torn apart in the comments to her blog for criticizing the work of several bloggers and designers. One of the comments from a different designer says that photos are from testers (another freebie you get) who may be less experienced with sewing. It is my firm belief that anyone can do good sewing if they take their time.  Perhaps the shoddy work is due to rushed testing. Not planning an appropriate timeline and rushing testers does not make for a good process. Testers will be unhappy with their garment, and you won't have usable promotional photos. 

In closing, be a professional, but be appreciative because you aren't compensating pattern testers. Designer, these are just kind people who do it because they enjoy helping. Please, make testing an enjoyable and rewarding experience. 

Yours truly,
Tester 

Now, after that, you may think that I may be unprofessional and may not need to test.  Actually, quite the opposite is true. I always do my best when sewing. I always try to keep my word. I give honest and critical feedback, but I am always tactful and respectful. That is why the experience that prompted this post was so upsetting. I have enjoyed testing all of the patterns so far, but this was the most stressful testing experience ever! 

So this will likely be the last pattern test for a while. I am annoyed and frustrated beyond belief!  I will not be worked this way when I am not being compensated. Even if I were being compensated, I wouldn't allow anyone to treat me with such disregard.  I am really quite over it. Unless it's for my son, I am not sewing it, and there are really only so many designs that little boys wear.  

And now to deal with the guilt of basically neglecting my child while stressing over trying to fulfill a constantly evolving commitment to Designer, and all for nothing!

End rant!

Tuesday, July 15, 2014

Boot Cut Heaven Pants for Dolls

I tested another doll pattern, and I am officially in love!

This time I used a red and pink abstract designed fat quarter to sew the Boot Cut Heaven by Amy Sue Adams of Made for Dolls. 

This pattern is a doll pants pattern with real inset pockets! OMG! You can put stuff in the pockets!!

The thing I love about Made for Dolls patterns is that the pieces fit together like a dream!

I have a strange story to go with these pants. I had cut the pants, and I was sitting down to sew by sunlight. I pinned my pocket facing and began to sew. I was wondering why the piece didn't fit perfectly together. Well, guess what? I had sewn the pocket facing to the crotch of the pants! Lol. 

Well as I was picking the seam, the the light bulb on my sewing machine flickered and went out. I thought, Well I had better learn to change the bulb. At least, I can keep sewing! Well my son went to turn on the light and NO POWER AT ALL! It was out until after midnight. 

Saturday, I got up and got ready to finish the pants. Got almost done and realized I needed the right sized elastic. Well, someone had stolen my tire and lug nuts off my car!! No shopping today!

Anyhow, here is the pattern as much as I have completed. I will be adding elastic after I get my tire fixed so I can get to the store. 

Anyhow, here are the pants! 


And I love doing pockets. Look! My topstitching is getting better!!

When I posted in the sewing group, I was told how cute it would be to make a triangle scarf and fringe bag for the doll! I could totally dress the doll like the girls in the Disney Channel Original Movie The Color of Friendship. (I absolutely LOVE that movie! If you haven't seen it, check it out next February! I insist!)

If you love this pattern, you can buy it from her Craftsy shop: http://www.craftsy.com/pattern/sewing/clothing/boot-cut-heaven/103587

I will update this post when I get elastic!

I thought I should mention that I tested this pattern and so it was free for me, but my opinions are still my own. I really do think these pants are cute!!


Stars and Stripes Dress and Tunic for Dolls

I think I have found a new love in sewing doll clothes! I had the opportunity to test the Stars and Stripes pattern from Amy Sue Adams of Made for Dolls. 

This pattern offers two dress options and a peplum tunic option, all of which include a fully lined bodice and a Velcro closure in the back. 

I made the tea length version which I made from a fat quarter that I got for a dollar at Joann's. The cotton pressed beautifully and the dress came out just so cute!  

Check out my chocolate paisley Stars and Stripes Tea Length Dress for 18 inch dolls! I am so proud of it!


I can't find any of my American Girl dolls, but the photos with the listing are just so darling! You should check them out!

I can see doing doll dresses to match the little girl dresses using the Cottage Mama Party Dress! It would be so cute!

If you think this pattern is cute and see all the possibility that it offers, you can purchase it from the Made for Dolls Craftsy shop: http://www.craftsy.com/pattern/sewing/toy/stars-and-stripes-18-in-doll-pattern/101495?fresh=true&NAVIGATION_PAGE_CONTEXT_ATTR=PATTERN

Below are some links you may find helpful. 


I thought I should mention that I tested this pattern and so it was free for me, but my opinions are still my own. I really do think this dress is cute!!

Playtime Pocket Pants for Cloth Diapered Toddlers

I was very lucky to test the darling little Playtimd Pocket Pants and Shorts by Jill Auxford of AimerLae and Finn because I just found out that my sister will be cloth diapering my new niece, and these little things will be perfect!

The pattern features a fold over yoga band waist that allows for adjustment in the rise as well as cuffs on the legs that allow for variation in length. This allows the pattern to be one size for children sizes 12 months to 3T. Furthermore, if you know anything about pattern adjustment, the pattern can easily be adjusted to fit bigger toddlers. 

I don't have a whole lot of pictures of this one because I didn't do anything new except the inset pocket. I may address that in another post if anyone wants me to. 

And here the shorts are with the band flipped up!

And here they are with the band flipped down (and the fabric showing truer color). 

The pants/shorts offer lots of extra bum room for the cloth diaper bums, and with as soft knit, they can be so comfy for babies and toddlers as they learn to work their little bodies. 

If you think these pants are darling, you can order the pattern from the AimerLae and Finn Etsy shop: https://www.etsy.com/listing/194840875/aimerlae-finn-playtime-pocket?ref=shop_home_active_1

There is a coupon code for a discount until Thursday: PPPSALE. 

I thought I should mention that I tested this pattern and so it was free for me, but my opinions are still my own. I really do think these shorts are cute!!


Mo's Lounge Gown, Lettuce Hems, and Knit Necklines

I sewed up the 6-12 month version of Mo's Lounge gown by Katrina Boin of MoBowtique! The gown goes all the way up to a size 10 though!!

It is a lovely little pattern with raglan sleeves and lettuce hems! 

I am in love with this little pattern and plan to make more! 

It came together so quickly and easily! 

I used a lightweight interlock (the same as I used in the Uptown/Downtown Dress- http://babystepstocouture.blogspot.com/2014/06/uptowndowntown-dress-sewing-knits.html).

So, here are my pictures of the dress. 

This one is before I finished, but it shows the lettuce hem so well!


And here is the dress with the neckline. On this pattern, I had to do some stretching to get the sleeves and neckline in. (Completely new concept to me. Lol)


And here is the dress on the baby. 

And I couldn't find a tutorial on how to do the lettuce hem the way I did so I will just describe it. First, I zigzagged around the edge of the entire dress with a medium sized zigzag stitch. Next, I took the dress to the ironing board, and I folded the zigzag stitch under and pressed, easing in the excess. Finally I took my dress to the sewing machine and sewed the hem down. I sewed with a straight stitch, stretching the fabric as much as I could as I sewed. I am not sure if the straight stitch was the best choice, but it worked for me. 

If you think this little gown is as cute as a button, you can purchase the dress from the Etsy shop: https://www.etsy.com/listing/196445409/mos-lounge-gown-nightgown-pattern-size?ref=listing-shop-header-0

Use this coupon code until Friday to get a 25 percent discount: RELEASE. 

I thought I should mention that I tested this pattern and so it was free for me, but my opinions are still my own. I really do think this dress/nightgown is cute!!

UPDATE: 
Here is some information on drafting and sewing knit neckbands: http://www.itsseweasytv.com/projects/series_300/307/ISE_307-1_INST.pdf


Wednesday, June 25, 2014

Uptown/Downtown Dress, Sewing Knits Without a Walking Foot, and a Little Known Tip from a Facebook Friend

I never sew anything that doesn't present an opportunity to learn something new! I was scrolling through my Facebook newsfeed and came across a pattern testing call from a wonderful designer, Terri Olson of TerriLin Collections. She just made her first pattern, the sweet little Uptown/Downtown dress! 

I felt this was a perfect dress to help me try out knits. I didn't get it perfect, but I think the dress still turned out great. Read to the end for some little known tips I learned in sewing groups that I will employ next time. 

So here is what I did!

First of all, I laid out my fabric. Her fabric layout requires that you fold both selvedges in toward the center. I am a grainline freak because I have worn lots of twisty clothes and refuse to sew any! So I painstakingly measured from the fold to the selvedge in several places to make sure that they were parallel. And laid out my pattern to cut. Then I was frustrated so I left the rest for the next day. 


So.... The next day...

I started pinning to sew. I practiced lots on my scraps. I tried running the fabric through the machine all willy nilly. It didn't work. The seam curled. I put tissue paper beneath, but I had bunching in front of the presser foot and that caused stretching and puckers. All bad!! 

So, I lined up my fabric evenly with as little stretching as possible. 

I cut a piece of tissue paper big enough to cover the seam. 


I put tissue paper on top and bottom of each seam. I sandwiched my fabric right between two pieces of tissue paper. 

I trimmed the tissue paper to the edge of the fabric so I had a nice even edge to line up with the lines on my sewing machine.  (Notice I pushed the pins down.)

After finishing all the shoulder seams (these are shoulder seams), I took the fabric (and tissue paper) to the sewing machine and sewed. The fabric didn't bunch up or pucker at all! And without a concerted effort and exerted strength (that would have probably broken my needle), that fabric wasn't stretching while I sewed!!

Et voila!!

I took off the tissue paper. 

Perfect seams, no walking foot!

Just in an effort to be honest, it is simple but time consuming. Check out the neckline! Looks like a medieval instrument of torture!! But I did the exact same thing. I laid the tissue over and under the fabric flat. I cut the tissue to the curve. 

But it turned out fairly nicely. It could have been better, but more on that later. 

The dress is nearly done. I am glad that I didn't hem it as my niece is quite tall and I will be adding a panel to the bottom of this dress to make it longer. It will be something like View A of this McCall's pattern I have been wanting to make forever!


Anyway, here is the almost finished dress!

It hit the knee on my niece unhemmed, but my sister wants it longer so I will be doing a brown contrast band at the bottom. 

WHAT I WILL DO DIFFERENTLY NEXT TIME:
Next time, I will let my fabric rest between the folding and pinning, and between the pinning and cutting. This is like working with bias fabric because it stretches. Handle it as little as possible. 

I had some issues in my cutting. So I pleated out the extra.


I have lots of bulk in the shoulders. Any tips on reducing it will be greatly appreciated!

Stay tuned for how I go about adding the contrast panel at the bottom and how I go about hemming. 

If you love the TerriLinn Collections Uptown/Downtown Dress, you can buy the pattern here in her Etsy Store: https://www.etsy.com/listing/194744430/the-uptowndowntown-dress-pdf-digital?ref=shop_home_active_1

The pattern is available in sizes 2T through 10. This pattern can go from play dress to formal dress by simply changing the fabric! I will be making many more of these in my future!! 


I thought I should mention that I tested this pattern and so it was free for me, but my opinions are still my own. I really do think this dress is cute!!

Update: Here are some more tips on sewing knit fabric. http://youtu.be/GARmdK1IWgk

Second Update (7/24/14): The name and link to the Etsy shop have changed. Here is the new link: https://www.etsy.com/shop/SewStraightPatterns?ref=hdr_shop_menu


Thursday, June 19, 2014

E+M Patterns Givaway Winner

Natasha Bailey is the winner of 20,000 member giveaway in the Sewing Inspiration and Tutorials Facebook Group, sponsored by E+M Patterns. She has won E+M Patterns Children's Pants No. 2 Pattern. (http://www.empatterns.com/)

This pattern is a versatile straight-legged pant pattern that includes many options. The most basic of the customization options is the pant leg length, which allows for pants or shorts. The pattern also includes inset hip yoke pockets, which can be sewn with or without ruffles. Finally, the back pockets can be pleated or ruffled. (In my opinion, they can be added on the side of the pants too for a cargo pants look!)

All E+M Patterns include a clear, step-by-step instructions with color photos that use two sided fabric (so we can tell which side we are viewing).  She also includes appropriate seam finishes, which help the user create a garment that is as beautifully constructed on the inside as it is on the outside, whether  using a standard domestic machine or serger to finish edges. The patterns also include sizing and finished garment measurement charts. Finally, the actual patterns are nested and fully computer drafted. 

The pattern she chose is linked below the picture! I will be sewing these up without ruffle pockets when I get a chance!

Tuesday, June 17, 2014

Run Jump Hop Skip Shorts and Round 2 on These Patch Pockets

Just recently, I had the pleasure of testing the Run Jump Hop Skip pattern for Stitch It Now!  It's a cute little pattern with a faux fly, patch pockets, and elastic in the back. The pattern comes in two lengths so that you can make pants or shorts. 

I really had fun sewing these little shorts up!  I am always up for learning something new and I learned a lot of something news with this pattern. 

MATCHING HORIZONTAL STRIPES
First, I decided to experiment with matching the horizontal stripes on plaid. Half the work occurs in the cutting and half occurs in the pinning. 

To cut, I laid my pattern out using one of the lines at the bottom as a base line. The bottom is a more prominent horizontal line than the waist is to me. So I lined the shorts up at the bottom. See how the pieces are lined up along that red line?


Then, when I pinned the shorts together, I was careful to match the horizontal stripes at least to the 1 cm seam allowance at each horizontal stripe.  I did this by pinning at each horizontal stripe. I pinned along the stripe, checking that it matched on the front and back. (Excuse the seam lines. I took all of the pictures after I finished.)

Here is the front where I pinned. 

Here is the other side. See how the pins are exactly on the line. 

THE FAUX FLY
I also had a chance to sew a faux fly. It can be confusing the first time if you overthink things the way that I do, but Amy has done a wonderful tutorial on her blog (http://friendsstitchedtogether.com/run-jump-hop-skip-pants-tour/). Here is my faux fly!


PATCH POCKETS AND EDGESTITCHING AGAIN
If you remember, I totally messed up the patch pockets on my last go round. The edgestitching left something to be desired. I was excited to try this pattern because of all the patch pockets! I had four chances to get it right this time! And I think I nailed it! Patch pockets:1 Me: 4! BOOM!!

ELASTIC IN THE BACK WAISTBAND ONLY
I think that putting elastic in the back of the waistband only is super great. First, it makes the shorts look neater in the front. Second, it uses less of that old expensive elastic! 

Here is the front of the waistband. Neat, right?

And here is the back! 


TOPSTITCHING
Ok. So my topstitching needs work. But look at those stripes, baby!!!

But these shorts are super cute and anyone looking that close can buy the pattern and make their own! My son loves his Stitch It Now Run Jump Hop Skip shorts. 

And just in case you aren't absolutely sick of looking at this plaid, here are some action shots!


He picked the bib himself so he wouldn't mess up his clothes. Lol


And he's gone!!

If you like these shorts as much as my Mini Me and I do, head on over to the Stitch It Now blog to get more information about purchasing the pattern for the Run Jump Hop Skip pants/shorts. There is a giveaway over there too! 

UPDATE: The release of these shorts has been delayed indefinitely. 

I thought I should mention that I tested this pattern and so it was free for me, but my opinions are still my own. I really do think these shorts are cute!!


Thursday, June 5, 2014

Learning with Allison: E+M Shirt No. 7

I was lucky enough to be chosen to test a pattern for E+M Patterns! It is a cute little colorblocked t-shirt, but the kicker is that it is made of woven fabric! It is rare to find boys patterns at all, and if you find a shirt, it is almost always a t-shirt or polo made from stretch fabric. If you do find a shirt made of woven fabric, it is almost always your more classic, tailored, button down.

This pattern was cute and funky!! It buttons at the shoulders so big heads can get in, has a pocket "for little treasures," and is just full of adorableness!  The colorblocking gives options for all sorts of fun twists and shouts!

So here are the deets!

Wednesday, June 4, 2014

E+M Patterns Shirt No. 7 Blog Tour and Giveaway

I am participating in a blog tour showing off the latest release from E+M Patterns!  The schedule is posted below. At each stop on the tour, you have a chance to check out the new pattern, funky variations and hacks, and reviews. Each blogger will also be giving away a pattern as well. So check out the itinerary below:

Tuesday, June 3, 2014

Drafting, Modifying, and Embellishing the Basic Tee

I was watching Sewing with Nancy few weeks ago, and I saw her doing some wonderful embellishments to a knit top. She did things like adding ruffles and flowers to just jazz it up a bit.  I thought a little about trying to figure out how to get a good fitting knit shirt pattern.

Then a few weeks later, I was watching It's Sew Easy, and she used a basic t-shirt pattern to make cardigan sets, cowl neck tops, tunics and so on!  I decided to immediately find out how to make a well fit knit pattern.  The best part is that knit fabric stretches and is rather forgiving as far as fit goes. 

So here, in this post, I am linking to the sloper drafting tutorial, the modifications for the various looks, and the embellishments!  I can't wait to try it!

Friday, May 9, 2014

My First Hand Embroidery Project

Well, it is not my first.  My grandma used to give me stuff like this to do when I was a child, but I haven't done any since I was about eight years old.  So, I decided to buy myself a kit to help me remember.  It isn't going to be the prettiest because I am going to be playing with the stitches a bit, but for about $5, it isn't so serious. (In fact, I actually bought this kid because the kit was about $1 more than just a hoop.) The kit includes the printed fabric, directions, the embroidery hoop, the needle, and all the thread you should need.  

The kit includes the opportunity to try several basic stitches, which I have listed below.  As I try the stitches, I will write posts and link them here as well.  I plan to use tutorials from Wendy Gratz from Shiny Happy World!!

Here are the stitches:
Satin Stitch
Back Stitch
Lazy Daisy
French Knot

The instructions include a diagram with a key. It explains which color and which stitch to use for each part of the embroidery. The letters in the diagram corespond to the written instructions. (Diagram for the visually/specially inclined and written directions for the verbally inclined... Works for me!!)


As you can see in the picture below, I have already started on the leaves. 


Baby Steps

Wednesday, May 7, 2014

My First Full Bust Adjustment on Princess Seams: Part 2-Moving the Apex Over

In the previous post, I covered moving the apex down. In this post, I will cover moving it over.  

I have measured myself quite extensively, and I know that my apexes are about 11 inches apart.  Now, on a princess seam garment, the princess line can hit one of two places: directly on the apex or just outside the apexes.  So as far as the distance between the apexes, we will use the edge of the princess line to guide us, ignoring the apex marked on the pattern. (I mean, logically different sizes would require the apexes be at different widths.)

So, with an apex distance of 11 inches, I would need at least 6.5 inches for the center piece to be wide enough at the bust.  So I will add about an inch or so.  

I measured out an inch and did my best to get that line in there without adding a huge arm hole.  I don't mind extra at the waist.  I will probably need it, but extra in the arm hole would be a nightmare.  The extra in the waist can easily be fitted out later.

Consider the princess seam and the apex moved!!

From here, I just followed some FBA tutorial.  I also added width at the waist.  To be sure, I remeasured all of my pattern pieces again. In the next post, I will reveal the tissue fit result.

My First Full Bust Adjustment on Princess Seams: Part 1-Moving the Apex Down

I am in a wonderful Facebook group, called Sewing Inspiration and Tutorials.  I got the advice on how to do this from there and this tutorial. 

Really this is my second attempt, but it is my first successful one!

First I traced my pattern and eliminated removed all of the seam allowances.

The first part of this adjustment involves moving the apex down.  You have to make sure that the fullness is in the right place or you will have some weirdness going on.  

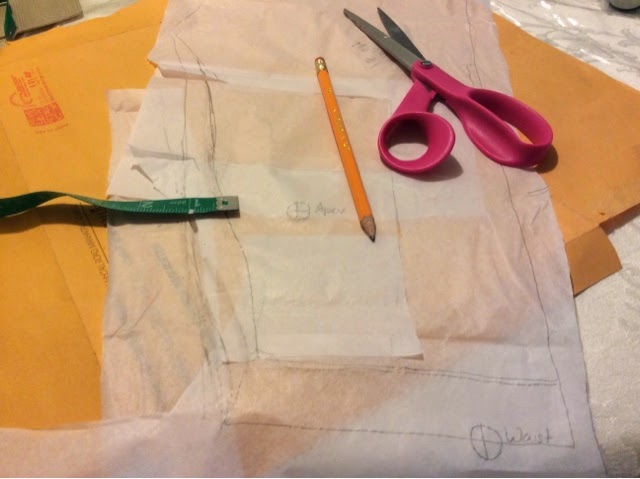
So first I measured from my shoulder to my apex and compared the measurement to the pattern. My measurement was 15 inches as compared to the 12 inches on the pattern.  This means that I need to lower the apex of the dress about 3 inches.


To lower the apex, I drew a box around the apex using the notches as reference points.  

Next, I cut the boxes out and moved them down 3 inches and taped the pieces in place. (Now, I would suggest putting tissue paper beneath before you do this.  It just makes things easier, but I put an envelope beneath so you could see.)

I taped the pieces to the tissue paper and trued the lines the best I could.

Next, I needed to mark the level of the apex on the side panel.  Since it was an 1.5 inches below the notch on the center, I measured the same distance on the side. (60-58.5=1.5)

The apex is at the right height!


Tuesday, April 29, 2014

My First Steps

It am very excited to learn more about sewing.  To be sure, I am a total beginner seamstress.  I have made a few very simple garments, but haven't ventured beyond everyday fabrics.  In fact, I am only just about to have my first go at knits and a full bust adjustment.  So wish me luck! I don't own a walking foot.  I was hoping that Barbara Deckert's Craftsy class on Plus Sized Pattern Fitting and Design would be helpful, but it really wasn't.  (I will write a formal review later.)

Anyhow, here is my plan: 
I will continue to sew for my son and myself. 
I will start with pattern fitting and a bit of hand embroidery. 
I also will be trying to get more well acquainted with my sewing machine. 


Next, if I can get a copy of the book, I would like to sew my way through Sarai Mitnick's The Collette Sewing Handbook.  I will work on pattern fitting through this whole process.
I will take Pam Howard's The Classic Tailored Shirt and make my 3 year old a shirt.  This will help me learn the process of making shirts.
I will also be trying my hand at some simple drafting: shorts for my son and a bodice for me.

Then, I will begin on my journey to more couture sewing.
I will read Claire Shaeffer's Couture Sewing Techniques, practicing all that I find in the pages.
I will take Susan Khalje's Craftsy Class The Couture Dress class and make a dress that way. (I am thinking that I will make the Cottage Mama Party Dress using those techniques.  It will be a birthday present for my niece.)
 also will be trying to get a copy of Claire Shaeffer's Fabric Sewing Guide. 
I will also be looking into Connie Long's Sewing With Knits.
I will also be looking into Susan Khalje's Bridal Couture and Cotton and Linen.

Next, I will embark on learning a bit of tailoring.
I will take Stephanie Lincecum's Classic Tailoring: The Blazer and make a blazer for my 3 year old son.
I also will be trying some fly front pants. 

Finally, I will try smocking and heirloom sewing.  I want to look at Sewing for a Royal Baby by the editors of Sew Beautiful Magazine and Perfect Party Dresses by Susan O'Conner. 


I will be thrifting the fabric for most of these projects: sheets and old garments from the Salvation Army and Goodwill so that my budget will permit plenty of practice. Now to find the time to practice.  Lol. 

The plan is subject to change, but...

My goals are to make homecoming, prom, and christening gowns.  So here we go!

Baby Steps!

Monday, February 24, 2014

Two Favorite PBS Sewing Shows

I have been thoroughly enjoying CreateTV and PBS--but mostly CreateTV!  I like the cooking, the traveling, the gardening, but most of all, I like the sewing!  I found out that two of my favorite shows are available to watch online: Sewing With Nancy (http://wpt.org/SewingWithNancy/Video) and It's Sew Easy (links below)!  Soon as I get a job, I am donating to PBS!!


It's Sew Easy Episodes (The links aren't live yet.  I am making this post for my sewing group so that they can have it.  Not being sloppy.  There is just a sense of urgency here.  Be back to update it when I get to a computer.) Since I listed the episodes by number, the first link at each series is like a table of contents. All of the videos are on Vimeo so be sure you are clicking a Vimeo link to watch the show. 

Series 100: http://www.itsseweasytv.com/program_notes_100.htm
101: http://vimeo.com/ksproductions/review/38499419/739521c66e
102: http://vimeo.com/ksproductions/review/38581196/828a3f1254
103: http://vimeo.com/ksproductions/review/38583127/a996f72b42
104: http://vimeo.com/ksproductions/review/38584486/8f538bce8e
105: http://vimeo.com/ksproductions/review/38585676/c7effae054
106: http://vimeo.com/ksproductions/review/38587250/c01752ca17
107: http://vimeo.com/ksproductions/review/38589853/5d6ad70c56
108: http://vimeo.com/ksproductions/review/38597262/59f3936c7a
109: http://vimeo.com/ksproductions/review/38601915/7e41e5fbe1
110: http://vimeo.com/ksproductions/review/38610260/de2612c83b
111: http://vimeo.com/ksproductions/review/38610899/3ba0425568
112: http://vimeo.com/ksproductions/review/38611847/e5076e36a3
113: http://vimeo.com/ksproductions/review/38613085/1ba1e75c48

Series 200: http://www.itsseweasytv.com/program_notes_200.htm
201: http://vimeo.com/ksproductions/review/44064715/de575b2ed0
202: http://vimeo.com/ksproductions/review/44064714/df67c94da1
203: http://vimeo.com/ksproductions/review/44068150/9287716198
204: http://vimeo.com/ksproductions/review/44086477/178db1f388
205: http://vimeo.com/ksproductions/review/44087741/2be6ba2983
206: http://vimeo.com/ksproductions/review/44087742/068c9365b3
207: http://vimeo.com/ksproductions/review/44087743/38af90cfd1
208: http://vimeo.com/ksproductions/review/44087744/250274fd5d
209: http://vimeo.com/ksproductions/review/44087745/b8e9c792d1 
210: http://vimeo.com/ksproductions/review/44099962/575866c8c7
211: http://vimeo.com/ksproductions/review/44099961/dd174a95a8
212: http://vimeo.com/ksproductions/review/44099960/78bd808a0f
213: http://vimeo.com/ksproductions/review/44099963/ad48d4c5fb

Series 300: http://www.itsseweasytv.com/program_notes_300.htm
301: http://vimeo.com/ksproductions/review/49396296/651a763dd9
302: http://vimeo.com/ksproductions/review/49413001/2cb3e8245a
303: http://vimeo.com/ksproductions/review/49413000/1436c44102
304: http://vimeo.com/ksproductions/review/49428180/8014482009
305: http://vimeo.com/ksproductions/review/49428178/ecbcfc40e3
306: http://vimeo.com/ksproductions/review/49428179/7669f39b1e
307: http://vimeo.com/ksproductions/review/49471508/f84fd5a67c
308: http://vimeo.com/ksproductions/review/49482125/c92c597bc5
309: http://vimeo.com/ksproductions/review/49471511/576a1f9fc5
310: http://vimeo.com/ksproductions/review/49471512/8bfe33c653
311: http://vimeo.com/ksproductions/review/49471513/584f0eb9c1
312: http://vimeo.com/ksproductions/review/49478422/fbe9363019
313: http://vimeo.com/ksproductions/review/49478421/6dac3d1572

Series 400: http://www.itsseweasytv.com/program_notes_400.htm
401: http://vimeo.com/ksproductions/review/55186964/0c234f3e20
402: http://vimeo.com/ksproductions/review/55186965/fbe7ff6a1f
403: http://vimeo.com/ksproductions/review/55186966/890eb6ec91
404: http://vimeo.com/ksproductions/review/55186967/9259671e44
405: http://vimeo.com/ksproductions/review/55186968/b3aa6ac408
406: http://vimeo.com/ksproductions/review/55190240/dc444dc1b4
407: http://vimeo.com/ksproductions/review/55190241/7dc7ccc165
408: http://vimeo.com/ksproductions/review/55190242/ba92b9d1c4
409: http://vimeo.com/ksproductions/review/55190243/cbcbbf0d87
410: http://vimeo.com/ksproductions/review/55190245/47da2d3371
411: http://vimeo.com/ksproductions/review/55193081/9bd916cef5
412: http://vimeo.com/ksproductions/review/55193082/2184fc4de8
413: http://vimeo.com/ksproductions/review/55193083/13c3fbf9ab

Series 500: http://www.itsseweasytv.com/program_notes_500.htm
501: http://vimeo.com/ksproductions/review/68751053/bf01dd2ebd
502: http://vimeo.com/ksproductions/review/68751054/dda7ecebcc
503: http://vimeo.com/ksproductions/review/68751055/b53360cdd3
504: http://vimeo.com/ksproductions/review/68751056/6b352a33d7
505: http://vimeo.com/ksproductions/review/68751057/34306da879
506: http://vimeo.com/ksproductions/review/68774367/2e2412f42c
507: http://vimeo.com/ksproductions/review/68774370/29982bb1d0
508: http://vimeo.com/ksproductions/review/68774371/995807933a
509: http://vimeo.com/ksproductions/review/68774373/218c5c2d3b
510: http://vimeo.com/ksproductions/review/68774372/30e98306f2
511: http://vimeo.com/ksproductions/review/68776607/cc669617a4
512: http://vimeo.com/ksproductions/review/68780301/d0abdf38a1
513: http://vimeo.com/ksproductions/review/68776606/852d69af6e

Series 600: http://www.itsseweasytv.com/program_notes_600.htm
601: http://vimeo.com/ksproductions/review/76723175/130177a06d
602: http://vimeo.com/ksproductions/review/76723176/4a2915ebab
603: http://vimeo.com/ksproductions/review/76723177/be44463dc7
604: http://vimeo.com/ksproductions/review/76723178/27f23b035e
605: http://vimeo.com/ksproductions/review/76723179/d1c2b2b934
606: http://vimeo.com/ksproductions/review/76744226/d018453339
607: http://vimeo.com/ksproductions/review/76744227/7d0790e10c
608: http://vimeo.com/ksproductions/review/76744228/006af7406a

Hope you enjoy them though!  I love these shows and plan to watch them all!  I am totally going to veg out in front of the tv.

Baby Steps

Thursday, January 23, 2014

Romanée-Conti Taste on a Tap Water Budget

Two main features of couture sewing that appeal to me are the fit and the expertise with which the garments are constructed.  Many of the designs, I could live without.  I desire expertly constructed, perfectly 

Wondering what RomanĂ©e-Conti is?  Well, it is a French wine that I have never tasted.  And Chanel is a French designer that I have never worn.  But from what I hear, both are top of the game!  And I hope to be tops in my field of expertise, the best mom to my son, and the best person and friend and sister and aunt (and whatever else to whomever else) that I can be!  So why can't I look good and be comfortable doing it?

I intend to look my best being the best I can be!  

I chose to start sewing because I thought it would be less expensive, and if I employ couture techniques and compare apples to apples it is!  What I also found is that it really can't compare to ready to wear!  Fabric costs that much alone!

However, getting that perfect fit intrigues me! I plan on drafting a few shirts, dresses, skirts, and pants.  I also plan on learning to alter commercial patterns to fit and still maintain the integrity of the piece.

I want to also learn more about fashion draping because I really don't know what that is.

So here is the short list of things to do:
Focus on fitting patterns
Focus on learning technique
Focus on drafting patterns

Here is how I will do it:
I will read.
I will watch videos.
I will sew.
And hopefully, I will be able to take a class one day!

And just as an FYI, my fashion icons are Michelle Obama, Oprah Winfrey, Dorothy Dandridge, Jackie Kennedy, Doris Day, Billie Holiday, Audrey Hepburn, Marilyn Monroe, and quite oddly enough, the ladies on the television series Charmed and Sex in the City!  I really am all over the place!

Well what can I say? Between my eclectic taste, my plus sized figure, and my limited budget, there is plenty of reason to learn to sew my own garments!

So join me!  Learn along if you want!  

Happy sewing!
Baby Steps