Tuesday, June 17, 2014

Run Jump Hop Skip Shorts and Round 2 on These Patch Pockets

Just recently, I had the pleasure of testing the Run Jump Hop Skip pattern for Stitch It Now!  It's a cute little pattern with a faux fly, patch pockets, and elastic in the back. The pattern comes in two lengths so that you can make pants or shorts. 

I really had fun sewing these little shorts up!  I am always up for learning something new and I learned a lot of something news with this pattern. 

MATCHING HORIZONTAL STRIPES
First, I decided to experiment with matching the horizontal stripes on plaid. Half the work occurs in the cutting and half occurs in the pinning. 

To cut, I laid my pattern out using one of the lines at the bottom as a base line. The bottom is a more prominent horizontal line than the waist is to me. So I lined the shorts up at the bottom. See how the pieces are lined up along that red line?


Then, when I pinned the shorts together, I was careful to match the horizontal stripes at least to the 1 cm seam allowance at each horizontal stripe.  I did this by pinning at each horizontal stripe. I pinned along the stripe, checking that it matched on the front and back. (Excuse the seam lines. I took all of the pictures after I finished.)

Here is the front where I pinned. 

Here is the other side. See how the pins are exactly on the line. 

THE FAUX FLY
I also had a chance to sew a faux fly. It can be confusing the first time if you overthink things the way that I do, but Amy has done a wonderful tutorial on her blog (http://friendsstitchedtogether.com/run-jump-hop-skip-pants-tour/). Here is my faux fly!


PATCH POCKETS AND EDGESTITCHING AGAIN
If you remember, I totally messed up the patch pockets on my last go round. The edgestitching left something to be desired. I was excited to try this pattern because of all the patch pockets! I had four chances to get it right this time! And I think I nailed it! Patch pockets:1 Me: 4! BOOM!!

ELASTIC IN THE BACK WAISTBAND ONLY
I think that putting elastic in the back of the waistband only is super great. First, it makes the shorts look neater in the front. Second, it uses less of that old expensive elastic! 

Here is the front of the waistband. Neat, right?

And here is the back! 


TOPSTITCHING
Ok. So my topstitching needs work. But look at those stripes, baby!!!

But these shorts are super cute and anyone looking that close can buy the pattern and make their own! My son loves his Stitch It Now Run Jump Hop Skip shorts. 

And just in case you aren't absolutely sick of looking at this plaid, here are some action shots!


He picked the bib himself so he wouldn't mess up his clothes. Lol


And he's gone!!

If you like these shorts as much as my Mini Me and I do, head on over to the Stitch It Now blog to get more information about purchasing the pattern for the Run Jump Hop Skip pants/shorts. There is a giveaway over there too! 

UPDATE: The release of these shorts has been delayed indefinitely. 

I thought I should mention that I tested this pattern and so it was free for me, but my opinions are still my own. I really do think these shorts are cute!!



Thursday, June 5, 2014

Learning with Allison: E+M Shirt No. 7

I was lucky enough to be chosen to test a pattern for E+M Patterns! It is a cute little colorblocked t-shirt, but the kicker is that it is made of woven fabric! It is rare to find boys patterns at all, and if you find a shirt, it is almost always a t-shirt or polo made from stretch fabric. If you do find a shirt made of woven fabric, it is almost always your more classic, tailored, button down.

This pattern was cute and funky!! It buttons at the shoulders so big heads can get in, has a pocket "for little treasures," and is just full of adorableness!  The colorblocking gives options for all sorts of fun twists and shouts!

So here are the deets!

Wednesday, June 4, 2014

E+M Patterns Shirt No. 7 Blog Tour and Giveaway

I am participating in a blog tour showing off the latest release from E+M Patterns!  The schedule is posted below. At each stop on the tour, you have a chance to check out the new pattern, funky variations and hacks, and reviews. Each blogger will also be giving away a pattern as well. So check out the itinerary below:

Tuesday, June 3, 2014

Drafting, Modifying, and Embellishing the Basic Tee

I was watching Sewing with Nancy few weeks ago, and I saw her doing some wonderful embellishments to a knit top. She did things like adding ruffles and flowers to just jazz it up a bit.  I thought a little about trying to figure out how to get a good fitting knit shirt pattern.

Then a few weeks later, I was watching It's Sew Easy, and she used a basic t-shirt pattern to make cardigan sets, cowl neck tops, tunics and so on!  I decided to immediately find out how to make a well fit knit pattern.  The best part is that knit fabric stretches and is rather forgiving as far as fit goes. 

So here, in this post, I am linking to the sloper drafting tutorial, the modifications for the various looks, and the embellishments!  I can't wait to try it!

Friday, May 9, 2014

My First Hand Embroidery Project

Well, it is not my first.  My grandma used to give me stuff like this to do when I was a child, but I haven't done any since I was about eight years old.  So, I decided to buy myself a kit to help me remember.  It isn't going to be the prettiest because I am going to be playing with the stitches a bit, but for about $5, it isn't so serious. (In fact, I actually bought this kid because the kit was about $1 more than just a hoop.) The kit includes the printed fabric, directions, the embroidery hoop, the needle, and all the thread you should need.  

The kit includes the opportunity to try several basic stitches, which I have listed below.  As I try the stitches, I will write posts and link them here as well.  I plan to use tutorials from Wendy Gratz from Shiny Happy World!!

Here are the stitches:
Satin Stitch
Back Stitch
Lazy Daisy
French Knot

The instructions include a diagram with a key. It explains which color and which stitch to use for each part of the embroidery. The letters in the diagram corespond to the written instructions. (Diagram for the visually/specially inclined and written directions for the verbally inclined... Works for me!!)


As you can see in the picture below, I have already started on the leaves. 


Baby Steps

Wednesday, May 7, 2014

My First Full Bust Adjustment on Princess Seams: Part 2-Moving the Apex Over

In the previous post, I covered moving the apex down. In this post, I will cover moving it over.  

I have measured myself quite extensively, and I know that my apexes are about 11 inches apart.  Now, on a princess seam garment, the princess line can hit one of two places: directly on the apex or just outside the apexes.  So as far as the distance between the apexes, we will use the edge of the princess line to guide us, ignoring the apex marked on the pattern. (I mean, logically different sizes would require the apexes be at different widths.)

So, with an apex distance of 11 inches, I would need at least 6.5 inches for the center piece to be wide enough at the bust.  So I will add about an inch or so.  

I measured out an inch and did my best to get that line in there without adding a huge arm hole.  I don't mind extra at the waist.  I will probably need it, but extra in the arm hole would be a nightmare.  The extra in the waist can easily be fitted out later.

Consider the princess seam and the apex moved!!

From here, I just followed some FBA tutorial.  I also added width at the waist.  To be sure, I remeasured all of my pattern pieces again. In the next post, I will reveal the tissue fit result.

My First Full Bust Adjustment on Princess Seams: Part 1-Moving the Apex Down

I am in a wonderful Facebook group, called Sewing Inspiration and Tutorials.  I got the advice on how to do this from there and this tutorial. 

Really this is my second attempt, but it is my first successful one!

First I traced my pattern and eliminated removed all of the seam allowances.

The first part of this adjustment involves moving the apex down.  You have to make sure that the fullness is in the right place or you will have some weirdness going on.  

So first I measured from my shoulder to my apex and compared the measurement to the pattern. My measurement was 15 inches as compared to the 12 inches on the pattern.  This means that I need to lower the apex of the dress about 3 inches.


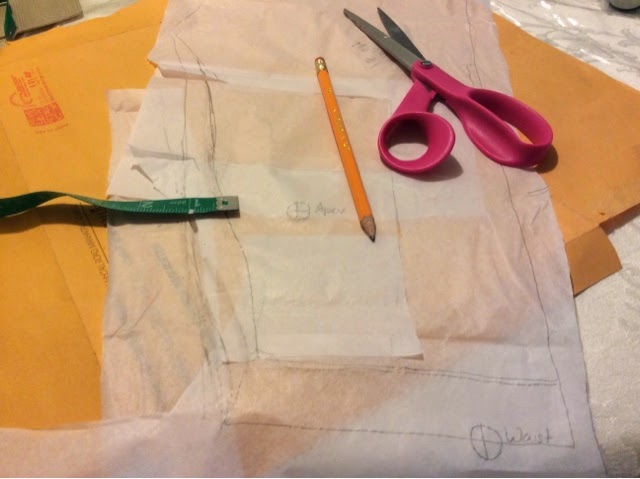
To lower the apex, I drew a box around the apex using the notches as reference points.  

Next, I cut the boxes out and moved them down 3 inches and taped the pieces in place. (Now, I would suggest putting tissue paper beneath before you do this.  It just makes things easier, but I put an envelope beneath so you could see.)

I taped the pieces to the tissue paper and trued the lines the best I could.

Next, I needed to mark the level of the apex on the side panel.  Since it was an 1.5 inches below the notch on the center, I measured the same distance on the side. (60-58.5=1.5)

The apex is at the right height!